Welcome to WordPress. This is your first post. Edit or delete it, then start writing!
Clean From the Top Down
- Remove dry dirt first by dusting or vacuuming
- Then clean with a wet cloth or mop
- I clean in a circle around each room so I don’t forget any areas
I save cloths and prevent cross contamination by cleaning in this order:
- mirrors
- dusting
- kitchens
- bathrooms
- toilets – though paper towels are best
- floors last
It’s best to use color coded cloths… One color for kitchens, a different colored cloth for bathrooms, or paper towels for toilets.
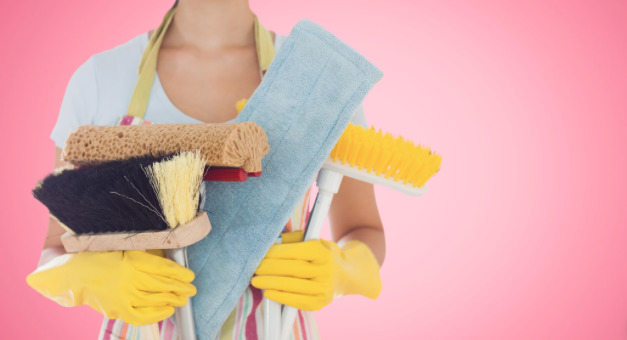
Essential Tools
It’s handy for carrying your cleaning products and also to use as a mop bucket. I prefer a sturdy one, but you can start out with one from the dollar store. Better yet look at this one by Rubbermaid, $15.72. It comes with a strainer so you don’t have to put your hands into the water. There used to be a red one at Walmart from O’Cedar.
There are buckets at Family Dollar for $7
Then You Need a Broom and Dustpan
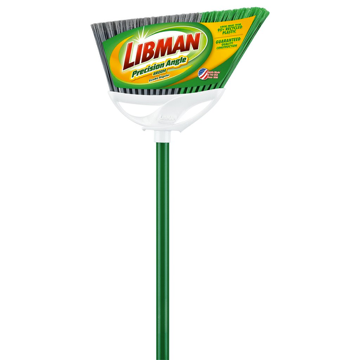
Using a broom is a simple and straightforward task. Here’s a step-by-step guide on how to use a broom effectively:
- Choose the right broom: Brooms come in various types and sizes, so make sure you have the appropriate broom for the task at hand. Indoor brooms are typically smaller and have softer bristles, while outdoor brooms are larger and have stiffer bristles for tackling tougher debris.
- Position yourself: Stand upright with your feet shoulder-width apart, ensuring you have a stable and comfortable stance.
- Grip the broom handle: Hold the broom handle firmly with one hand near the top, and the other hand lower down the handle for better control.
- Sweep technique: Start sweeping by positioning the broom at a slight angle to the floor or ground, with the bristles touching the surface. Use long, smooth strokes to move the debris in the desired direction. For efficiency, try sweeping in overlapping arcs or straight lines.
- Adjust pressure and angle: Adjust the pressure and angle of the broom based on the type of debris you’re dealing with. Lightly brush the surface for fine particles, while applying more pressure and angling the broom for larger or stubborn debris.
- Collect the debris: As you sweep, collect the gathered debris into a pile or dustpan. You can either sweep it into a central location or push it directly into a dustpan for easy disposal.
- Dispose of the debris: Once you’ve collected the debris, either transfer it to a garbage bin using a dust pan or dispose of it appropriately depending on the type of waste.
- Maintain cleanliness: After using the broom, give it a good shake or tap it against a solid surface to remove any lingering dust or debris. You can also use a clean cloth or brush to clean the broom bristles if necessary.
- Store the broom: Find a suitable location to store the broom, such as a closet or utility room, where it will remain upright and protected.
Remember, using a broom may vary depending on the specific task or type of surface you’re cleaning. Always follow any manufacturer’s instructions provided with the broom, especially if it has any unique features or attachments.
Regenerate response
Next a Wet Mop
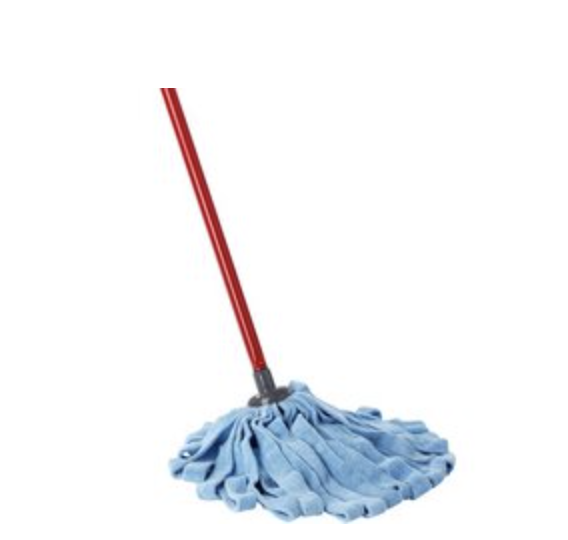
Use any that you prefer. This is my favorite, the Tuff Mop from O’Cedar. It has microfiber strips. Refills are available and you can throw the mop head into the washer.
Using a wet mop is an effective way to clean and sanitize floors. Here’s a step-by-step guide on how to use a wet mop:
- Prepare the mop and cleaning solution: Ensure that you have a clean and properly maintained wet mop. If using a traditional mop, make sure the mop head is clean and in good condition. If using a mop with disposable pads, ensure you have a fresh pad attached. Fill a bucket or cleaning container with the appropriate cleaning solution. This could be a commercial floor cleaner or a mixture of water and a mild detergent.
- Clear the area: Remove any furniture, rugs, or obstacles from the area you intend to clean. This will allow you to have unobstructed access to the floor surface.
- Pre-treat stubborn stains (if necessary): If you notice any stubborn stains or spills on the floor, consider pre-treating them before mopping. Use a suitable stain remover or cleaner and follow the manufacturer’s instructions.
- Dip the mop into the cleaning solution: Immerse the mop head or pad into the cleaning solution, making sure it is fully saturated but not dripping excessively. If using a traditional mop, wring out the excess solution by pressing it against the side of the bucket.
- Start mopping: Begin mopping from one end of the room, working your way towards the exit or the farthest corner. Use a figure-eight or back-and-forth motion to cover the floor evenly. Apply gentle pressure as you mop, allowing the mop to glide smoothly over the surface.
- Pay attention to corners and edges: Use the edges of the mop or a smaller mop or cloth to reach corners and edges that the main mop may have missed. This will help ensure thorough cleaning.
- Rinse and wring the mop (if necessary): If the mop head or pad becomes excessively dirty or loses its effectiveness, rinse it out or replace it with a clean one. Wring out any excess water or solution before continuing to mop.
- Allow the floor to dry: After you’ve finished mopping, allow the floor to air dry. If necessary, you can assist the drying process by opening windows, using fans, or turning on the ventilation.
- Clean and store the mop: Rinse the mop head or pad thoroughly with water to remove any cleaning solution or debris. Hang the mop to dry or place it in a well-ventilated area. If using a disposable pad, remove it and discard it appropriately.
- Clean the mop bucket: Empty the dirty cleaning solution from the bucket and rinse it with clean water. Allow the bucket to dry before storing it.
Easy to wring out in the bucket above.
Buy at Walmart or on Amazon

Flat Mop systems are very handy. You can use a dust mop pad, then switch it out for a wet mop pad. After your pad becomes dirty, swap it out for a clean one.
An Apron Saves Time
Saves you time, you don’t have to run back and forth so much. Keep your cloth and sponge there. If you have a good squirt bottle that doesn’t lose it’s top very easily, you can hang the bottle on the apron loop. Check the spray top often for tightness.
My favorite apron was by Fiskars, made for gardeners. I would put 2 aprons on 1 belt, but they are not being made at this time. You can still locate these in a few places on the internet,….
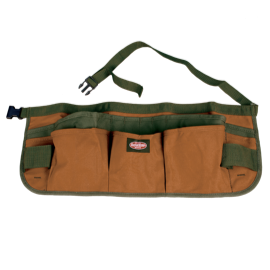
My new favorite is this apron on amazon. Easy to clean, snaps on, waterproof, big pockets!
Or just buy an apron at the hardware store, or get a Fiskars pocket for buckets and modify it to your needs.
Also check out Jeff Campbell’s place for aprons.
Vacuums
You could use the one at their home or office, but I find that the homeowner’s vacuum usually lacks power or is unreliable. I like to bring in my own vacuum into a business and keep it there, just make sure that they understand that your vacuum is not to be used for anything like construction clean up.
If you are cleaning your own home, keep one vacuum upstairs and another one downstairs. This will save you the trouble up carrying one upstairs. I like to use a heavy duty extension cord so I can plug the vacuum in once on each floor and keep working. You can use a hand held vac for the stairs for weekly cleaning, and use a full size one on them occasionally.
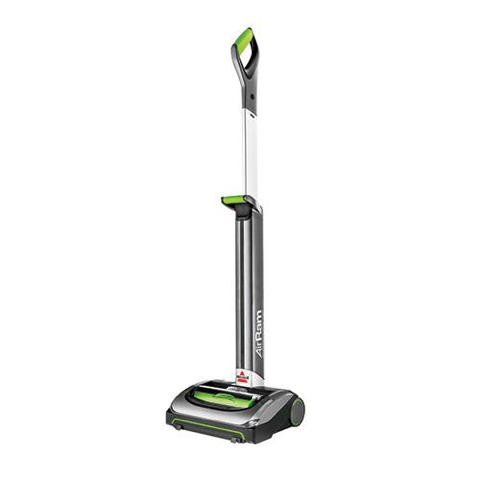
My new favorite is the Bissell Air Ram. I just bought it on QVC.
- Led lights on front
- Lightweight – weight on the floor, not on your wrist/arm, like the Dyson.
- Run time is 40 minutes on a battery charge.
- No attachments
- Easy battery charging
- Easy dust bin removal and empty
- Washable filter
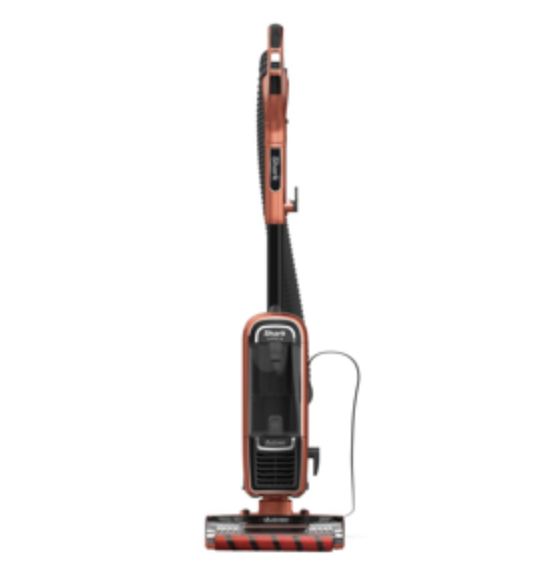
I actually like the Shark Lift Away vac the best if you want attachments. Good suction. If you can’t afford a big purchase go to QVC to buy with payments.
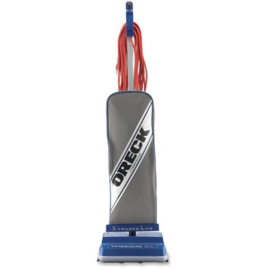
Orecks have changed, more styles. They are light weight so this is a big consideration if you are planning to carry your vacuum to different homes or businesses. The dirt will pass through the fan blades though.
Vacuuming is an effective way to remove dust, dirt, and debris from carpets, rugs, and other floor surfaces. Here’s a step-by-step guide on how to vacuum properly:
- Prepare the vacuum cleaner: Make sure your vacuum cleaner is in good working condition and the bag or canister is empty or not overly full. Check that the brush roll or beater bar is clean and free from tangled hair or fibers. If necessary, consult the vacuum cleaner’s manual for specific instructions.
- Clear the area: Before you begin vacuuming, remove any large objects, toys, or obstacles from the floor. This will allow for easier maneuvering of the vacuum cleaner and ensure a thorough cleaning.
- Adjust the height settings: Many vacuum cleaners have adjustable height settings to accommodate different carpet lengths or floor types. Set the height according to the surface you’re cleaning. For carpets, set the height so that the brush roll lightly touches the carpet fibers without overly compressing them. For hard floors, raise the height to avoid scratching the surface.
- Start from the farthest corner: Begin vacuuming from the farthest corner of the room, working your way towards the exit or the nearest doorway. This ensures that you don’t walk over the areas you’ve already vacuumed, preventing dirt from being tracked back onto the cleaned surface.
- Use slow and overlapping strokes: Slowly push the vacuum cleaner forward in a straight line, allowing the suction and brush roll to effectively remove dirt and debris. Then, pull the vacuum cleaner back towards you, slightly overlapping the previous path. This overlapping motion ensures thorough cleaning and prevents any missed spots.
- Pay attention to high-traffic areas: Give extra attention to high-traffic areas, such as entryways or hallways, where dirt and debris tend to accumulate more. Vacuum these areas in multiple directions to ensure a deep clean.
- Vacuum in different directions: To ensure all areas are thoroughly cleaned, vacuum in different directions (north-south, east-west) on carpets. This helps dislodge dirt and debris from various angles and ensures a more effective cleaning.
- Clean edges and corners: Use the vacuum cleaner’s attachments, such as a crevice tool or upholstery brush, to clean along the edges, corners, and baseboards of the room. These areas often collect dust and dirt that can be missed during regular vacuuming.
- Empty or replace the bag/canister: If your vacuum cleaner has a bag, empty it when it’s about two-thirds full to maintain optimal suction. If it has a canister, empty it when it reaches the recommended fill level. Follow the manufacturer’s instructions for proper bag or canister removal and disposal.
- Clean and maintain the vacuum cleaner: After vacuuming, take a few moments to clean and maintain the vacuum cleaner. Remove any tangled hair or fibers from the brush roll or beater bar. Wipe down the exterior of the vacuum cleaner and clean or replace the filters as necessary.
Regular vacuuming is essential to keep your floors clean and free from dirt and allergens. The frequency of vacuuming depends on the level of foot traffic and the type of flooring. In high-traffic areas, vacuuming at least once or twice a week is generally recommended.
The Cleaning Cloth
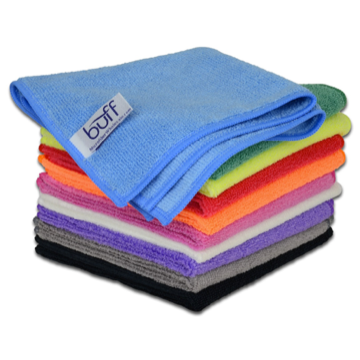
Microfiber Cloths are your essential tool. They remove 99% of germs, and when you use water or diluted cleaners, and wring your cloth out well, they leave little or no streaks.
When they are dry they make a great dust cloth and grab loads of dust. I think that it is best to spray your cloth to slightly dampen it before using.
Microfiber cloths are durable and can be reused multiple times. Regularly inspect the cloth for signs of wear and replace it if necessary to maintain its cleaning effectiveness.
BJ’s has a good deal in the car section, 25 in a pack for $10.00 last time I checked. You can also find them at Walmart in a 5 pack.
Using a microfiber cloth is an excellent choice for cleaning various surfaces as it is highly effective at trapping dust and dirt. Here’s a step-by-step guide on how to use a microfiber cloth:
- Select a clean microfiber cloth: Ensure that your microfiber cloth is clean and free from any debris or previous cleaning solutions. If necessary, wash and dry the cloth according to the manufacturer’s instructions before use.
- Identify the surface to clean: Determine the surface you want to clean, such as countertops, glass, electronics, or furniture. Microfiber cloths are versatile and can be used on a wide range of surfaces.
- Dampen the cloth (optional): Depending on the surface and the type of cleaning required, you may choose to dampen the microfiber cloth with water or a suitable cleaning solution. Make sure the cloth is damp and not dripping wet to avoid excess moisture.
- Fold or unfold the cloth: Microfiber cloths often come in large sizes, so consider folding it into smaller, manageable sections. This will provide better control and allow you to use different sides of the cloth as you clean.
- Start cleaning: Gently glide the microfiber cloth over the surface you want to clean. Use light pressure and circular or back-and-forth motions to effectively pick up dust and dirt. Microfiber cloths have unique properties that attract and trap particles, so there is no need to apply excessive force.
- Pay attention to details: Focus on areas that tend to accumulate dust or grime, such as corners, edges, and crevices. Use the edges or folded sections of the cloth to access and clean these hard-to-reach spots.
- Rinse or change the cloth as needed: If the cloth becomes dirty or saturated with dirt, rinse it with water, or replace it with a clean one. This will help maintain its effectiveness and prevent spreading dirt from one surface to another.
- Dry the surface if necessary: After cleaning, if the surface is damp or wet, you can use a dry microfiber cloth to absorb any excess moisture. Microfiber is highly absorbent and can help in achieving a streak-free finish on glass or other surfaces.
- Clean the microfiber cloth: After use, rinse the microfiber cloth with water or follow the manufacturer’s instructions for cleaning. Avoid using fabric softeners, bleach, or high heat when washing microfiber cloths, as these can reduce their effectiveness. Hang the cloth to dry or tumble dry on low heat.
- Store the microfiber cloth: Once the cloth is clean and dry, store it in a clean and dust-free location. Avoid storing it with other cleaning supplies that may transfer dirt or chemicals onto the cloth.
Feather Dusters
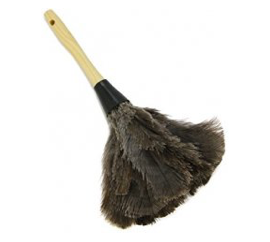
Ostrich feature dusters are great for fast dusting and removing small spider webs quickly. The black feathers are the best I think.
I found one in Ingles grocery store. It is a Libman product.
Use smooth strokes, not jerky, and occasionally hit it against your lower leg to knock the dust off so it falls to the floor for sweeping or vacuuming.
I got my duster from Texas Feathers with a long handle. If you have a short handle you can carry the duster around in your back pocket. If the feathers get dirty, just wash in mild soap and rinse well. Slap it gently against the wall of your shower occasionally as it dries, hang it up with the feathers down.
Using a feather duster is a quick and effective way to remove light dust and particles from surfaces. Here’s a step-by-step guide on how to use a feather duster:
- Select a clean feather duster: Ensure that your feather duster is clean and free from any dust or debris. Shake it gently to remove any loose feathers or dirt.
- Position yourself: Stand comfortably near the surface you want to dust. You can also sit or kneel if necessary, depending on the height and size of the object or furniture.
- Hold the feather duster: Grip the handle of the feather duster firmly but gently, allowing your fingers to wrap around the handle for better control.
- Start dusting: Starting from the top, gently glide the feathers of the duster over the surface you want to clean. Use light, sweeping motions to collect and trap the dust.
- Pay attention to details: Pay special attention to intricate or hard-to-reach areas such as corners, crevices, and decorative elements. Use the soft feathers to gently access and remove dust from these spots.
- Use proper technique: Avoid pressing down too hard or using excessive force while dusting, as this may cause the dust to scatter or damage delicate surfaces. Let the feathers do the work, and maintain a gentle touch.
- Shake off the dust: Periodically shake the feather duster outside or into a garbage bag to remove the collected dust. You can do this by gently tapping the duster against a your leg or by giving it a gentle shake in the air near the floor.
- Clean the feather duster: If your feather duster becomes excessively dirty or clogged with dust, you may need to clean it. Check the manufacturer’s instructions for cleaning recommendations, as methods can vary based on the type of feathers and handle. Some feather dusters can be gently washed with mild soap and water, while others may require dry cleaning.
- Store the feather duster: Once you’ve finished using the feather duster and it is clean and dry, find a suitable place to store it. Hang it in a well-ventilated area or store it in a clean container to keep it free from dust and dirt.
- Maintain your feather duster: Regularly inspect your feather duster for any signs of wear or damage. Replace it if the feathers become too sparse or damaged to effectively trap dust.
Using a feather duster is a convenient way to quickly remove surface dust. However, it may not be suitable for heavy cleaning or removing ingrained dirt or stains. In such cases, you may need to use alternative cleaning methods or tools.
Glass Cleaner
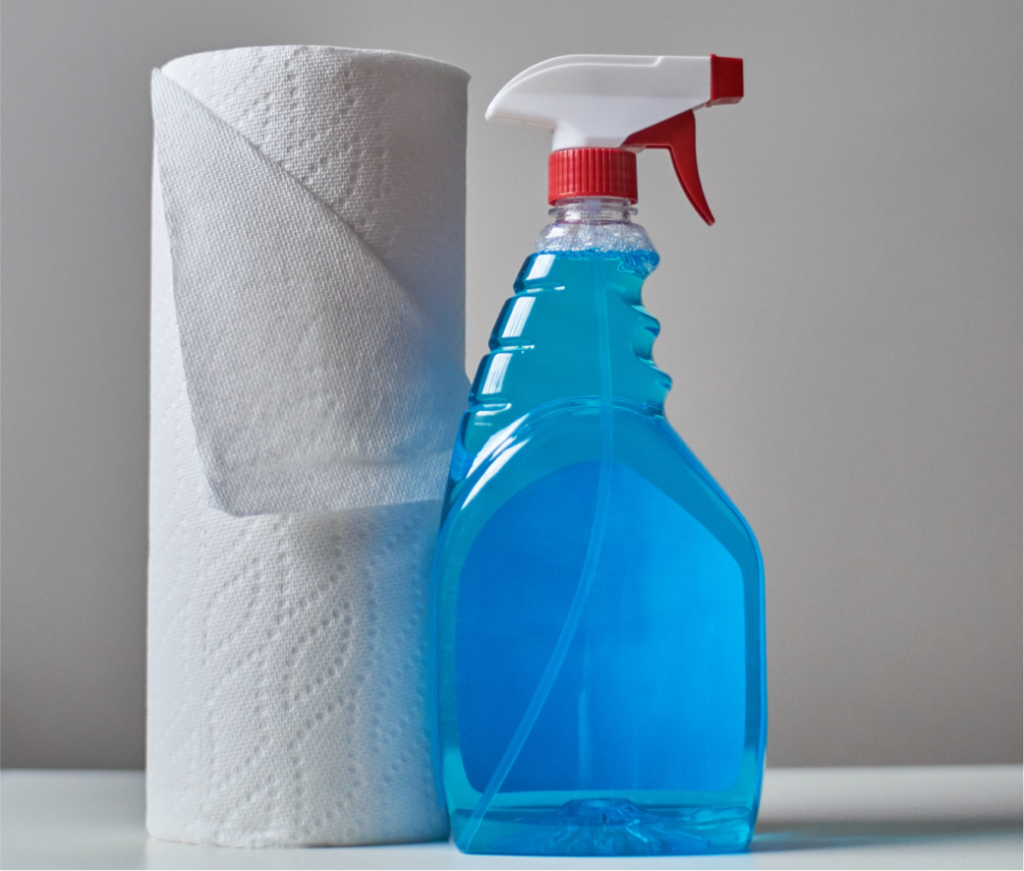
A very handy cleaner. Keep a bottle under every sink for quick cleanups. You can even use it on floors.
If there are no smokers in the house, you can just use water on glass and mirrors.
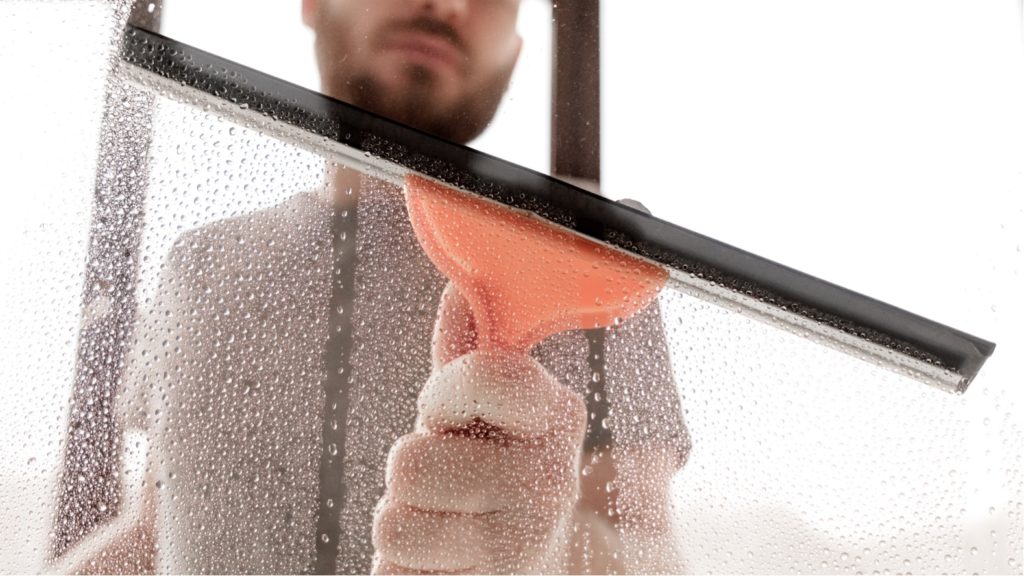
Windows
Cleaning windows can be a straightforward process with the right tools and technique. Here’s a step-by-step guide on how to clean windows effectively:
- Gather your supplies: Before you start, gather the necessary supplies. This typically includes window cleaner (either a commercial cleaner or a homemade solution of water and vinegar or dish soap), a squeegee, a microfiber cloth or lint-free towels, a bucket, and a scrubbing tool like a sponge or window cleaning brush.
- Choose the right time: Ideally, choose a cloudy or overcast day to clean windows. Direct sunlight can cause the cleaning solution to dry quickly, leaving streaks.
- Prepare the cleaning solution: If using a commercial window cleaner, follow the instructions on the label. If making your own solution, mix water and vinegar or a small amount of dish soap in a bucket. The ratio can vary, but a common guideline is 1 part vinegar or dish soap to 10 parts water.
- Remove dust and debris: Before applying the cleaning solution, remove any dust, cobwebs, or loose dirt from the windows and window sills using a dry cloth or a brush. This will help prevent the cleaner from turning into a muddy residue.
- Apply the cleaning solution: Dip your scrubbing tool, such as a sponge or window cleaning brush, into the cleaning solution. Apply the solution evenly to the window surface, working from top to bottom. Avoid oversaturating the windows to prevent excess drips.
- Scrub the windows: Use your scrubbing tool to gently scrub the window surface, paying extra attention to areas with stubborn dirt or grime. Be thorough but careful not to apply too much pressure that could potentially damage the window.
- Use the squeegee: Starting from the top corner of the window, place the squeegee against the glass at a 45-degree angle. Pull the squeegee down in a straight line, using a smooth and steady motion. Wipe the squeegee blade with a clean cloth or towel after each stroke to remove excess water.
- Repeat with overlapping strokes: Repeat the squeegee process, overlapping each stroke slightly, until you have covered the entire window. Remember to wipe the squeegee blade after each stroke to maintain a clean and streak-free result.
- Dry and touch up: Once you’ve completed the squeegeeing process, use a clean microfiber cloth or lint-free towel to wipe any remaining moisture from the window edges and corners. Check for any streaks or spots and touch up if needed.
- Clean the window frames and sills: Don’t forget to clean the window frames and sills using a damp cloth or sponge. Wipe away any dirt or residue, and dry the surfaces thoroughly.
- Enjoy clean and clear windows: Step back and admire your clean windows! Repeat the process for other windows as needed.
Shower Cleaner
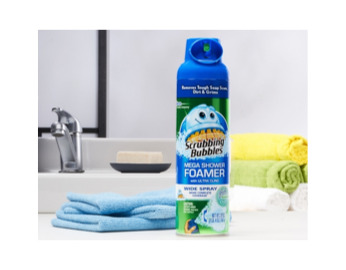
The Mega Shower Scrubbing Bubbles Foamer saves a lot of time by dissolving the scum without much scrubbing the first time you try it, then the next time you clean just wipe and rinse. It has a wide spray for good coverage.
Look for the blue can.
Cleaning a shower requires some specific steps to ensure effective removal of soap scum, mold, and mildew. Here’s a step-by-step guide on how to clean a shower:
- Gather cleaning supplies: Before you start, gather the necessary cleaning supplies. This typically includes a bathroom cleaner or a mixture of vinegar and water, a scrub brush or sponge, a microfiber cloth or towel, a toothbrush (optional for detailed cleaning), and gloves.
- Pre-treat the shower: If your shower has heavy buildup or stubborn stains, you can pre-treat the area to help loosen dirt and grime. Spray the bathroom cleaner or vinegar mixture on the surfaces, focusing on areas with soap scum or stains. Allow it to sit for a few minutes to work its magic.
- Clean the shower walls and doors: Starting from the top, work your way down the shower walls and doors. Use a scrub brush or sponge to scrub the surfaces, applying pressure on areas with stains or buildup. If necessary, use a toothbrush to clean hard-to-reach areas or grout lines. Make sure to scrub all the surfaces thoroughly, including corners, edges, and grooves.
- Clean the shower floor: Next, focus on the shower floor. If it’s tiled, scrub the grout lines to remove any dirt or stains. For non-porous surfaces like fiberglass or acrylic, use a non-abrasive sponge or cloth to clean the surface. Pay attention to any textured areas where soap scum and grime can accumulate.
- Address fixtures and hardware: Don’t forget to clean the shower fixtures, such as the showerhead, handles, and knobs. Use a microfiber cloth or sponge soaked in the cleaning solution to wipe down these areas. If there is any buildup or limescale, you can use a vinegar-soaked cloth or a toothbrush to remove it.
- Rinse the shower: Once you have thoroughly cleaned all the surfaces, use the showerhead or a bucket of clean water to rinse away the cleaning solution. Make sure to rinse all the walls, doors, and floor to remove any residue.
- Dry and polish: Use a dry microfiber cloth or towel to dry the shower surfaces. This helps prevent water spots and streaks, leaving your shower looking clean and shiny. Pay attention to corners and crevices where moisture tends to linger.
- Clean the shower fixtures: After drying, go over the shower fixtures once again with a dry cloth to polish and remove any remaining moisture. This step will help prevent water stains or streaks from forming.
- Preventive measures: To keep your shower cleaner for longer, consider implementing preventive measures such as using a squeegee after each shower to remove excess water, using a daily shower cleaner, or periodically applying a protective coating to the surfaces.
Scrubbing Sponge
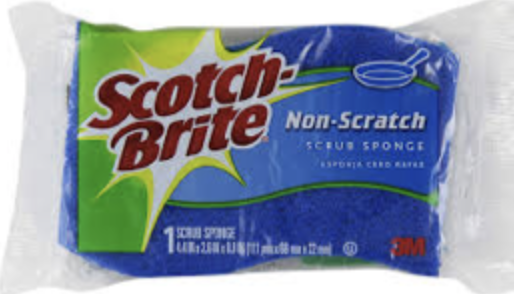
A Scotch Brite Sponge is another essential tool for cleaning sinks and showers. The green side is aggressive, so don’t use it on your teflon pots.
I recommend the non abrasive sponges for cleaning Teflon and for cleaning.
Plug In Once and Go
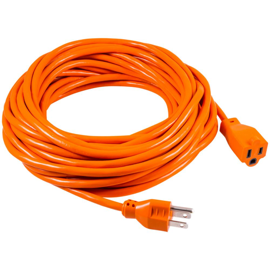
I usually clean one floor at a time. It is a waste of time to plug in the vacuum and then unplug it to go to another room.
I like to use an extension cord connected to the vacuum so I can vacuum the whole upstairs or downstairs without the interruption of unplugging and moving to each room.
House Designers should plan an electric plug in a central position on each floor.
Videos
CLEANING WINDOWS
CLEANING BLINDS


